Dronesizer pt 1

Excellent news everyone. I’ve begun working on my Drone Synthesizer. I decided to use an Arduino for the generation of audio, and a simple Digital to Audio Converter in the form of a resistor ladder.  I have one of these at home and code that sends very basic waveforms to speaker out since this summer. Me and Puterman was starting to make an Arduino demo for Compusphere (a demo scene event) I made all the hardware for TV-out and sound out, but that was as far as we got. Good for now tough. I had it all done so I could start the coding. Awesome.

I’ve done a large batch of the coding, and it does sound rich and fat with and it takes very low CPU. I had not problem adding 4 voices with my engine, witch was in part inspired by gieskes hard softsynth 2. This here tutorial on make magazine on how to make a resistor ladder for the Arduino is good, not what I used but I could not find that original place I read this summer.

So I now have to think on what I should add to my Dronesizer, I really want distortion, but I can use my distortion-tester for that. Also low-pass band-pass and high-pass filters would be awesome. Perhaps an EQ then 🙂 Maybe a delay or echo just to fatten shit up. I also have to think of how I want to control the Dronesizer. I have at-least 15 parameters to control. Also I want something nicely visual to spicen the stuff up.

So now I’m looking for information on that stuff. Life is great!

Dronesizer

I want a drone-machine. You know something for creating rich drones. and by rich I mean distorted and noisy. http://casperelectronics.com/finished-pieces/drone-lab/drone-lab-v2/ might be one of the nicest sofar, and I think I’ll get me one of these. I just have to sell the Roland SP-404 first.

In the mean-time I’ll design and build one myself. Perhaps that will be good enough for me, although the casperelectronics one has some real nice features I wont be able to do.

So I’m thinking using one Arduino, with a DAC out, a resistor ladder DAC, building on an experiment I did a while ago. With some nice waveforms, and analog pot’s to control the drones. Then maybe I’ll build a few distortions to hook into the audio-path. And perhaps … something more. Now where did I my resistor ladder code.

RAIDing the os x

A friend of mine David, lost all his stuff due to hard rive failures, not one, not two, but three failures over a year. When his second drive failed and all that data was unsaveable I decided to get a proper backup system going. I did not want to loose all my songs, my photos or my source code, not that either of these will save the planet but they are important to me.

So my old way of burning stuff on DVD’s where out of the question, that took to long and besides, with the cheap DVD’s I buy it’s not like I would be able to recreate the data again. So hard-drives then or an internet-based backup then? well, I save some stuff with drop-box (free version)

Then I made a OS X mirrored raid. It’s dead easy, just follow these steps:

  1. Buy 2 identical external disks (I bought 2 1tb USB2.0)
  2. Connect them to your computer
  3. Open Disk Utility
  4. Create a new Mirrored Raid in Disk Utility and drag-drop the two new drives onto it.
  5. Press yes yes OK finish
  6. PROFIT!

This was dead easy, but as it turns out, there are no warning mechanisms in OS X, the best you can do is to use the console to do a diskutil checkRAID to se of they are online. This was not good enough for me so I did a quick versiontracker search and found a program (that I guess just calls that command) and screams,emails shop dialogs when either drives are offline. It’s called RAID Eye and I guess having that is better then having a pink eye 🙂

Now I’m secure, and I wont lose a all my shit, and there is plenty of space for my wife to put her stuff on as well.

FSU, but for JPEG’s

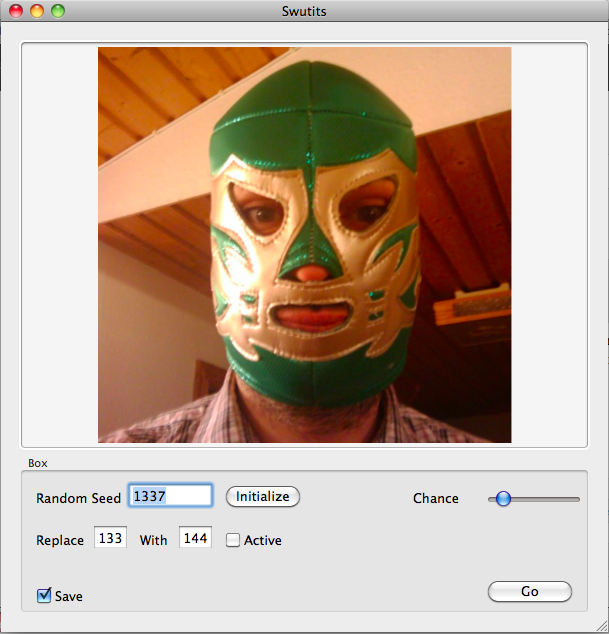
I made a song the day before yesterday, It’s noisy and I felt it needed a glitchy video. Then I ran into a brief tutorial on how to make jpeg’s glitched by editing them with a hex-editor. This took way to long time for me so I made a little os x program, “Swutits”

With this little program I can do a lot of nice stuff. and here’s a manual:

Go button creates a glitched version of your loaded image.
save check box turn’s on or of the save function (I think, I haven’t tried turning it of)
Random Seed enables you to set where the random numbers shall start, change this and press Initialize button and you will get the same image, press again and  new random numbers will be taken, but always in a series from the initialized. You will be able to recreate the exact glitches should you want to.
Replace changes one number in the file to another should you have that active.
Chance changes the probability of the other glitch routine, having the meter to the left is a lot and to the right is less.

In the menu you can load a new image to glitch, it will only take jpg or jpeg files, you can also drop them on the dock.

all the files are saved to a “swutits” directory in your current logged in users Documents folder. You can easily open this via the file/Open output Folder menu option.

Remember that different image -viewers show faulty images differently, so …. results may vary.

here’s the download: Swutits

I’ve been thinking about adding the follow features:

  • Batch create a bunch of images.
  • Extract images from movie, glitch them, x number of times.
  • Putting the glitched images into a movie.

If you have any more ideas, please comment!

DIY laptop pillow

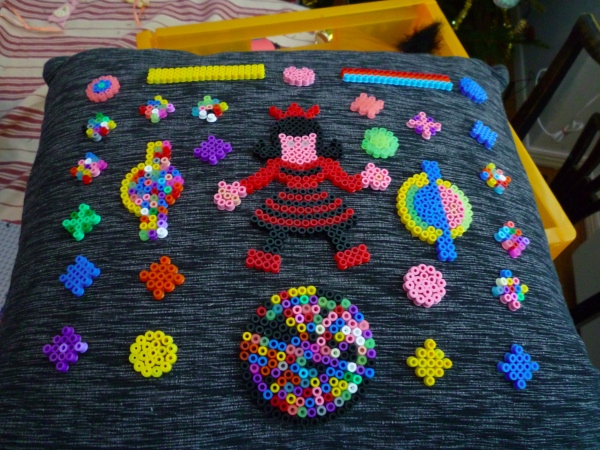
For my kid sister this Christmas, me and the kids made a laptop-pillow. There are a few on the market, but they where either out of stock or to expensive. After searching instructables for both laptop stand and laptop pillow with no real success. So we figured (me and the kids) that all we needed was a pillow of ok proportions and something to get the laptop up a bit from the pillow so that air could circulate under the laptop.

We made a lot of pearls after failing to find enough buttons to sew on. My kids made a lot of very pretty pearls (you know the kind you put together on a plate. anyway’s here is a picture:

How I made a twitterbot for fun and profit! part 1

Twitter right, I guess I’m old because I cant think of when it would be useful for me. Not that I’ve really tried, I’m just tired of status updates on Facebook, Skype and whatnot. And 140 characters is at most lengthy enough for me to say a few swearwords.Much like Lars Ulrich, the drummer of Danish origin playing in Metallica.
I guess by now, dear readers, you are guessing as where to my social engineering prank is going.
That is correct, I’m gonna go program myself a Twitter-bot that twitters “fuck”,”FUCK”, fack”, “fock” etc etc at different times from screen name Lars Ulrich. While I thought this fun and all a year ago when I ran into the idea the first time It was not enough to actually do the thing. Then I read a book on how to market stuff via social media, yeah I know it’s out of character for me, and the writers was going on and on about twitter, and retweets and twitter searches.
This made me think about the old Lars Ulrich idea and how it could actually grow by itself. First of, if the twitter API let you do searches and re-tweets I could have that automated. And If I do that, ppl will start to know about the character and it might grow.

Step one was to look at the twitter API’s, easily enough they are just http requests and xml reponses and all the functions I think I might need are there.
Secondly I registered the users, he/it is here http://twitter.com/i_am_larsulrich, if you’re late in the game, the real person might have already registered his name 🙂

I’ve also found someone who has done a lot of the work I would need to do and more in the sourcecode from http://mattgemmell.com/2008/02/22/mgtwitterengine-twitter-from-cocoa.

So to recap, my program, should it be finished with the original specifications, should be able to:
Tweet different permutations of the word fuck.
Search for other ppl that tweets the word fuck.
Retweet tweets with the word fuck in them.
Answer to random persons fuck tweets.

I’m also aware that I might be thinking this more funny then Lars’s lawyers and Metallica fans, but they might just aswell think it’s more funny then me. I hope they do, and this will not be a permanent bot, just a little test I’ll use to see what happens.

Hope you will enjoy the ride with me!

Using processing to render knobs version 1.

As you may all know I have made a few VST’s, they are down-loadable over at www.shuriken.se. Since I’m no draw in painting program guru I’ve struggled with cooperating with graphic artists and trying to do stuff myself. I’ve actually done the latest of the graphics programatically using processing and I’d thought I’d share. Both since it’s pretty nifty and since I’ve lost the source code myself due to keeping it in strange places.

First Version I use is based on images, I take a background image and a handle image and rotate the handle round. What’s not shown in this example is that you can add flares and shadows and stuff like that and rotate them in other ways using transparency to achieve even nicer results.

+=    when you only have 20 steps. I could post a 200 step version but that would prove nothing.

The processing sketch for this is here : GenerateKnob_1.zip

More to come